How to Bake or Cure Polymer Clay - Tips & Rules
Home Page › Polymer clay baking
Baking Your Polymer Clay
Baking/curing is the most important element of success in creating with polymer clay.
You can create the most amazing piece, but if it melts, burns or breaks because it’s undercooked – it’s sad.
 Polymer clay needs to be baked in a regular oven for it to become hardened and durable. To bake your polymer clay creations, you will need an oven that can be accurately programmed to generate temperatures between 215°F (102°C) to 325°F (163°C). This range is sufficient to bake any polymer clay item.
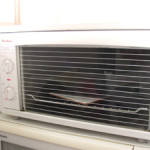
You can use a regular oven, a toaster or a convection oven BUT not a microwave oven.
It is fine to use your regular kitchen oven if you are not baking polymer clay too often or if you have a tall item to bake. However, if you are going to create a lot of polymer clay items, consider buying a dedicated oven for your polymer clay items.
 Polymer clay is rated safe and non-toxic for people; they have been tested to be so. However, while it is baking, the clay does produce fumes, which some people are sensitive to.
Some brands of clay (such as Kato) smell stronger than others, and some people are more sensitive to this smell than the others. The walls of your oven adsorb polymer clay fumes, and after baking polymer clay (in your regular oven, for example), you may notice the polymer clay smell next time when you use the oven for something else. That is why it is better to have a dedicated polymer clay oven.
=> Never bake polymer clay items and food in the same oven at the same time.
It is also a good idea to limit exposure of small children and pets to polymer clay fumes during baking.
If you are concerned about the smell while baking polymer clay items, consider placing your oven in a well-ventilated area or in an isolated room, cover your polymer clay item with foil or place it between two disposable aluminum pans clipped together to create a “chamber” to catch the fumes, after baking, leave your polymer clay item in the oven to cool down, if possible.
If polymer clay is baked above it’s recommended temperature, it will darken. That means your project will look burnt. Make sure the temperature inside the oven is correct by using an oven thermometer. Many ovens come from the store with funny scales or something you can’t figure what is the temperature inside. Don’t buy these ovens or place an oven thermometer on the tray, and put the tray in the center of the oven. Test bake your oven first to see where you need to set the oven dial for the interior temperature to be correct. Once you figure out where to set the dial, it’s a good idea to mark the knob with a marker but keep the thermometer inside, just in case.
Polymer clay usually bake between 215°F (102°C) to 325°F (163°C). A temperature that is too low will leave your piece “looks like” it is done but it will be brittle and easily broken. Check the packaging of your clay to see exactly what the manufacturer recommends.
It is better to avoid combining different brands of clay until you are comfortable with baking. Later on, you may want to combine two or more different types of clay with different baking temperatures in your creation. In this case, bake the mixture at the lowest temperature required for its components.
Recommended minimum baking time is 20 minutes per 1/4″ (6 mm) of thickness at the appropriate temperature. You may bake a 1/4″ thick piece longer if you wish, but keep in mind that, for some brands, light colors may darken with long baking. The thicker your polymer clay piece, the longer you will need to bake. I bake my pieces for a full hour (60 minutes). Baking for more than the recommended time isn’t harming your polymer clay as long as the temperature is correct. Theoretically you can “forget” your pieces in the oven over night (although I wouldn’t recommend that ;)
What should you use as a baking surface?
For flat objects, use a baking tray (dedicated to clay), glass or ceramic tiles. Shiny spots may be seen on the surface of your polymer clay items coming in contact with ceramic tiles during baking. If you want to avoid this, cover your tile with a sheet of paper.
Dimensional pieces (such as round beads or small sculptures) may be baked on polyester stuffing or on a pile of cornstarch or baking soda, on cardboard holders, paper towels, crumpled aluminum foil, and other materials. Keep in mind that polymer clay softens up a little bit during baking, so you may want to make sure your bead wouldn’t be flat on the side he was placed on the tile.
When you clay is all baked but still hot, it will be rubbery – not hard! It hardens as it cools, so just leave it aside to cool down.
Polymer clay doesn’t shrink when baked, but sometimes bead holes tend to get a little smaller. Make sure you make them a little larger than needed.
Polymer clay can be re-baked many times, and you’ll find instances where this will be needed. Be sure that the entire piece is baked for the appropriate amount of time, even if a larger portion of it has been cured once.
Now you are ready to go!
Go ahead and check out the variety of tutorials offered in this site and start creating!
GET ACCESS TO FREE TUTORIALS!
Get access to my free polymer clay tutorials, useful tips, special announcements, discounts & news!
JOIN TODAY!
Enter your name and email in this section and a message with the freebies link will be waiting in your inbox.POLYPEDIAONLINE EXPRESS GUARANTEE
2000+ students, 10,000 Subscribers, 120+ classes.