Polymer Clay - How and Where to Start
Home Page › Start your way with polymer clay
Polymer Clay – How and Where to Start
 A polymer clay artist, whether a beginner or advanced needs only a few basic supplies to produce successful results.
Some of the best artists don’t use many tools beyond the basics. If you’re visiting this site, it means you are wondering about this material called “polymer clay”. The 1st time I saw polymer clay was on 2005 when I joined a small group of women and made a simple millefiori cane. Where did you see polymer clay for the 1st time? :)
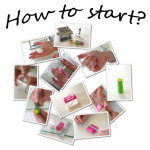
So, Where to start?
Although, there is an impressive list of tools and materials you can purchase for this new hobby you don’t have to buy them all at once, you will not need all of them (not right away).
Most of the tools and materials are not very expensive, but they add up very quickly.
To make it easier for your budget, buy only the tools you need at the moment.
How do you decide what you need?
Find a project or two that you would like to start with, it can be something from the internet or a meeting with a polymer clay friend. When looking for internet projects, most projects description include a list of tools and materials. There are many sites on the Internet where you can look for projects. I would suggest picking one that is suitable for beginners.
Some of PolyPediaOnline tutorials are also designated to beginners, I am currently working on a new PolyPediaOnline section just for beginners but it may take a while until it is available.
In the following list I am reviewing many tools and materials, not all of them are a “must” for beginners.
To my opinion, these are the 5 “must” tools for beginners:
1. Polymer clay
2. Working surface
3. Roller/Pasta machine
4. Blade
5. Oven (with a thermometer)
and of course your talented hands :)
Take the time to read along and choose your tools according to the project you are creating but remember, you don’t have to buy all at once, I’m still collecting tools and materials and adding a few every time i see something interesting :)
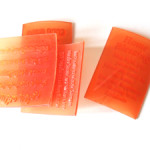
 Polymer Clay
Polymer clay is a synthetic modeling material that remains maleable until it is cured by baking at a low temperature. All polymer clays are basically made up of polyvinyl-chloride (PVC), pigment and solvents. Most project descriptions avoid mentioning specific brands, yet you will find at least a few different types of polymer clay in a craft store and even more on the Internet.
Which one to buy? Each country carries different brands, In Norway i heard there is just Fimo, in Germany Fimo and Pardo are the most popular, in USA mostly Premo. Check at your local craft stores (USA – Michael’s, Joann Crafts or Hobby Lobby), and do your best to pick clay that is not too firm (Premo is very comfortable to start with and easy to soften). Once you are more comfortable with polymer clay, you may want to switch to other brands of polymer clay (such as Kato which is the strongest after curing but is also pretty stiff in its raw form and requires more conditioning than other clays)
For more information, please refer to this page about different types of polymer clay.
Before you go to the store, decide what colors of clay you would like to use for your project. You may have to buy more than one block if multiple colors are required for your project. Keep in mind, that different colors of clay may be mixed just like regular paints, so if your project requires yellow, green, and blue, you can simply buy yellow and blue (and mix them to obtain green). You can also mix different kind of clays!
 A Work Surface
The best surfaces for working with polymer clay are a smooth ceramic tile, a plexi-glass piece or a sheet of glass, flat placements sheets are also optional but you would need to use tape to secure it to the table so it won’t move all the time. Don’t use the surface of your room table or any other surface you care about, raw polymer clay may damage/stain surfaces and it is better to keep it separate for your dedicated projects.
 Oven
Oven
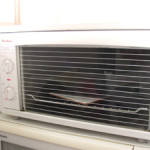
Baking is the most important element of success in creating with polymer clay. You can create the most amazing thing, but if it melts, burns or break because it’s undercooked – it’s sad. Polymer clay needs to be baked in a regular oven for it to become hardened, durable.
To bake your polymer clay creations, you will need an oven that can be accurately programmed to generate temperatures between 215°F (102°C) to 325°F (163°C) – according to manufacturers instructions. This range is sufficient to bake any polymer clay item.
For more details on baking polymer clay, please see a separate page
General Tools and Materials
If you have tried other crafts, you may already have some of the tools and materials that are required for your first polymer clay project, some other tools may be borrowed from your kitchen or throughout the house. These include knives, roller, grater, and many more. However, to be safe, it is wise to designate these tools for polymer clay only. I have posted about the use of kitchen tools in my PolymeriOnline Blog – you are welcome to check that list
 Rolling Tools
A pasta machine is invaluable for rolling smooth, even sheets of polymer clay at various thicknesses. It is used to roll out the clay quickly and accurately. If you are planning to use polymer clay as a new hobby or an occupation, consider purchasing a polymer clay dedicated pasta machine and make your life much much easier.
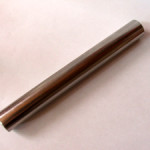
If you are not sure yet about this new hobby, I would suggest getting a roller. You can use an acrylic rod or brayer for hand rolling sheets of clay. However, any smooth, lightweight tube will work as a rolling tool. You can also use a good clear simple plastic roller that can be found in a craft store. If you decide to buy the pasta machine later, the roller will still be useful.
 Cutting Tools
Most projects requires the cutting or slicing of stripes/slabs/shapes and polymer clay millefiori canes.
A few simple cutting tools will make the job easier –
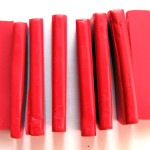
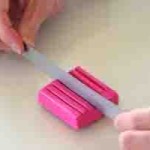
Clay Blades
Blades for polymer clay are available in craft stores, . They are usually 6″ (15 cm) long and come in both flexible and rigid types.
For some projects they can be substituted with a disposable cutter from a home store. I personally used them a lot when i started with polymer clay and we didn’t have any alternative, other blades weren’t available.
For safety, I suggest marking the dull side of the blade with some nail polish/permanent pen. Be careful!!
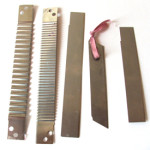
A Ripple Blade
A very useful tool. Sometimes sold in a 3 blade set (regular blade, flexible blade and ripple blade).
 Cookie Cutters
Come in various shapes and sizes and may be found in the polymer clay section in most craft stores or in food/cakes supply stores. I have plenty of them and they are my favorite tools.
Texturing Tools
Texture adds another dimension of design to polymer clay, offering unlimited possibilities for your clay projects. You can buy texturing tools or make and adapt your own –
Commercial Rubber Stamps
Stamps are used with polymer clay and can be found in craft stores, scrapbooking and rubber stamping supply stores.
There are many different types of stamps available:
Mounted rubber stamps are perhaps what most people think of when they think of rubber stamps. These stamps are supplied ready to use in a wide variety of styles. Good quality rubber stamps produce very detailed images. ‘Deep etched’ rubber stamps are ideal for stamping into soft surfaces such as polymer clay.
 Unmounted rubber stamps are an increasingly popular alternative to mounted stamps. These stamps consist of just the ‘die’ part of the stamp. Unmounted stamps are often cheaper than their mounted counterparts and most stamp manufacturers offer both mounted and unmounted stamps.
Clear or Acrylic Stamps are very much part of the ‘stamping revolution’. These clear stamps temporarily adhere to acrylic blocks making the precise placement of stamps simple and straightforward. They are available in all sizes and styles. After stamping, clear stamps are simply cleaned and popped back onto a backing sheet ready for the next use.
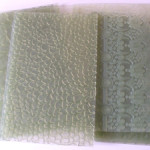 Plastic/Elastic Texturing Sheets
For etching or rubbing may also be used with clay, these can even be used with your pasta machine and rolled through with the clay.
Objects found around your home can offer interesting textures or patterns – baskets, wood, buttons, metal parts can all be pressed into clay to create dimensional effects.
Sand Paper
Used for finishing (#400-#1200) and for texturing (coarse).
The high numbers of sand paper required for sanding polymer clay (#400 to #1200) may be found in hardware stores, auto stores or in automobile repair sections of department stores.
You can also find them in specialized stores for polymer clay and on-line.
Specialized Tools
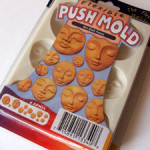 Push Molds
With Push Molds & polymer clay, anyone can become an “instant artist.” There is a wide range of them, in a wide range of prices. You may also make your own molds either from polymer clay or special molding compounds.
A Clay Extruder (or a Clay Gun)
A clay extruder is a small barrel and plunger with a number of dies in various sizes and shapes. There are so many things you can do with a clay extruder. I use mine for making polymer canes (especially “Retro canes”), making borders, dolls hair etc. You must be sure to buy a good extruder.
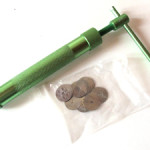 The wrong polymer clay gun will demand a “superhero” arm strength and will leave you frustrated! I recommend the “Makins Professional Ultimate Clay Extruder”.
Craft Heat Gun Can be used to set clay, including liquid clay, in small area in order to proceed to the next step without waiting for a gull baking cycle. Experiment with the heat gun and an oven thermometer to see how long it takes to bring an object to clay-baking temperature. I personally don’t own one.
Useful Additions
Some projects may call for acrylic paints, powders, metal leaf, and other stuff. If you do not have these materials already, buy small quantities in a craft store or use an alternative for now. For example, mica powders can be substituted with make up powders. If you just want to try your hand in polymer clay, get only the colors you need first. If you decide to keep this hobby, you can look for a better deal on the Internet later and buy more.
To read the complete list of materials and terms used in the “polymer clay World” – visit my Poly-Dictionary section of the site.
As you can see, all you need to start playing with polymer clay is a few basic tools and materials. That is one of the exciting things about polymer clay, you can use it for all kinds of projects, from jewelry to home decor, and the number of techniques to try is endless.
Happy Claying! :)
GET ACCESS TO FREE TUTORIALS!
Get access to my free polymer clay tutorials, useful tips, special announcements, discounts & news!
JOIN TODAY!
Enter your name and email in this section and a message with the freebies link will be waiting in your inbox.POLYPEDIAONLINE EXPRESS GUARANTEE
2000+ students, 10,000 Subscribers, 120+ classes.