How to Condition and Prepare Your Polymer Clay To Work
Home Page › Polymer clay conditioning
Conditioning and Softening your Polymer Clay
Even though some brands of polymer clay fills soft and pliable right out of the package they still have to be conditioned before being used.
You can condition clay by hand, or run in the through a pasta machine. Doing this thoroughly mixed the plastisizer inside the clay, which makes it stronger after baking.
 To make conditioning easier, start with warming up your clay in small pieces. You can carry the clay close to your body in a zip-lock bag, or put the bag into your pocket for a few minutes. Some people sit on their clay to warm it up, which is also an option :)
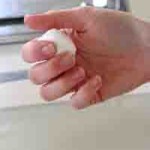
Alternatively, you can use a grain pillow (See VIDEO) to warm the clay but keep a close eye on it and leave the clay there for no more than few minutes (you do not want it to start curing). You are ready to start conditioning your clay once it feels pliable. Start with about an ounce of a small block of clay, roll is to a long snake, fold it a couple of times and roll it back. Work until it stretches nicely and won’t break when folded.
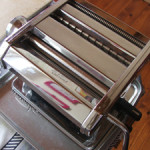 A pasta machine can make conditioning a breeze! Cut your clay to about 1/4″ thickness before you put it though the pasta machine for the first time, use your roller to flatten it if needed, don’t throw inside the machine slabs too thick or the rollers may become misaligned. Use the highest (the thickest) setting on your pasta machine. Roll a sheet of clay, fold it in half, and then roll again on the same setting. Repeat it as many times as needed to soften the clay. Make sure to feed the folded part first into the machine to avoid trapping any air in the clay. You can use the pasta machine to mix and condition 2 colors at once, they should be sufficiently mixed and have a uniform color.
If your clay crumbles during conditioning, here are a few tricks that can help –
 1. Mix soft polymer clay together with stiff and crumbly polymer clay, place them in a plastic bag, after several days the plasticizer from the soft clay will leach into the harder clay and you’ll be able to mix them together.
Don’t have time to wait? mix them together in the pasta machine but remember you’ll have plenty of crumbles to collect until both clays unify. Check out my video on helping with this step.
2. If you are willing to dedicate a food processor to your polymer clay art (no food and clay together), you can use it to assist conditioning. Chop your clay into small pieces before putting them into the processor, run it in short bursts. If the blade is jamming, chop up the larger pieces of clay. keep a close eye on what’s happening inside the processor. They clay will get chopped into tiny bits and that the action and the heat will make these bits easier to condition. Remove the clay and from the bowl and place it on your working surface, flatten with a roller and place in your pasta machine to condition it to a unified sheet.
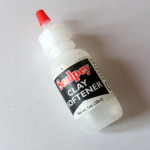 3. Sometimes, the clay is so stiff, that it seems impossible to condition it following the instructions above. This may happen if the clay is too old or was stored at higher temperatures and started to cure. To soften this clay, consider adding some Clay Softener. This product may be found in craft stores next to polymer clay or on-line; you will only need a few drops of it per small package of clay. You may substitute it with a few drops of Liquid Clay (Liquid Clay is a more universal product than Clay Softener and may be used for other tasks as well). Liquid Clay is available from Fimo, Sculpey and Kato. Baby oil or lotion (small quantity) may help as well of you can not find the materials listed here.
Fresh, out-of-package clay may sometimes present an opposite problem and be too soft and sticky for your project. When you have the opposite problem – clay is too soft, leach out the plasticizer by placing flat sheets of clay on white paper (not inked ones, they might transfer to the clay). The oily plastisizer will soak into the paper, making the clay stiffer. If you want to remove a lot of plastisizer, put weight on the paper/clay and change the papers as they become saturated. The surface of the clay touching the paper will “dry” and stiffen. Then roll the clay again to condition it.
If you are buying clay in a store and have the opportunity to test it, always check it for hardness by pinching, since occasionally clay is left in the sun on supplier car or otherwise mishandled in a way that causes it to harden prematurely. (Some clay brands are harder than others and only slightly pressed with your fingers – such as Fimo Classic or Kato.)
 With all that said, don’t be afraid to use old polymer clay. I’m using packages of polymer clay dated 2006 and they are still good! i wouldn’t give them to children to work with, but they can be conditioned using the methods above.
Is there such a thing as too much conditioning?
There’s no way for clay to be “too well-conditioned”, but some clays get softer and softer the longer they’re worked and the warmer they get. If your clay is getting too soft for the technique you want to use, you can let it rest overnight, or chill it for an hour or so, to firm it up.
Some artists mentioned that too much conditioning of translucent polymer clay causes “flakes” in it after baking. I haven’t tested this so consider conditioning translucent clay a bit less then regular clay.
Click here to learn “How to cure/bake Polymer Clay“
GET ACCESS TO FREE TUTORIALS!
Get access to my free polymer clay tutorials, useful tips, special announcements, discounts & news!
JOIN TODAY!
Enter your name and email in this section and a message with the freebies link will be waiting in your inbox.POLYPEDIAONLINE EXPRESS GUARANTEE
2000+ students, 10,000 Subscribers, 120+ classes.